
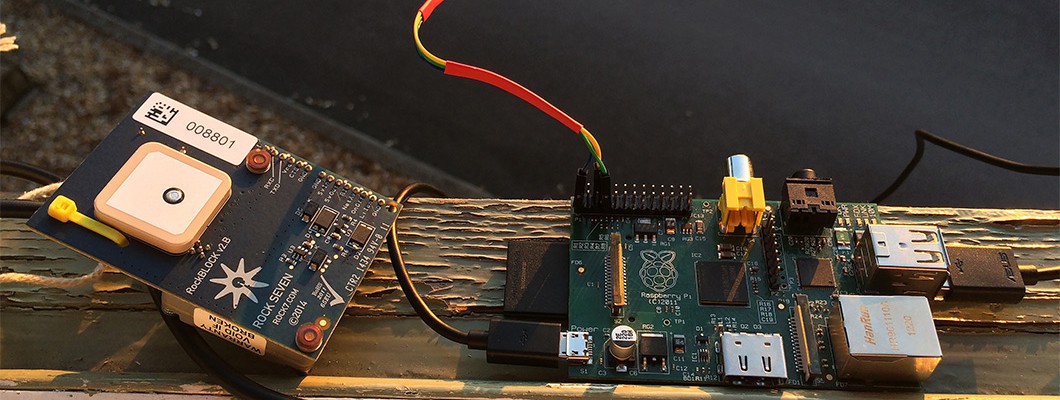
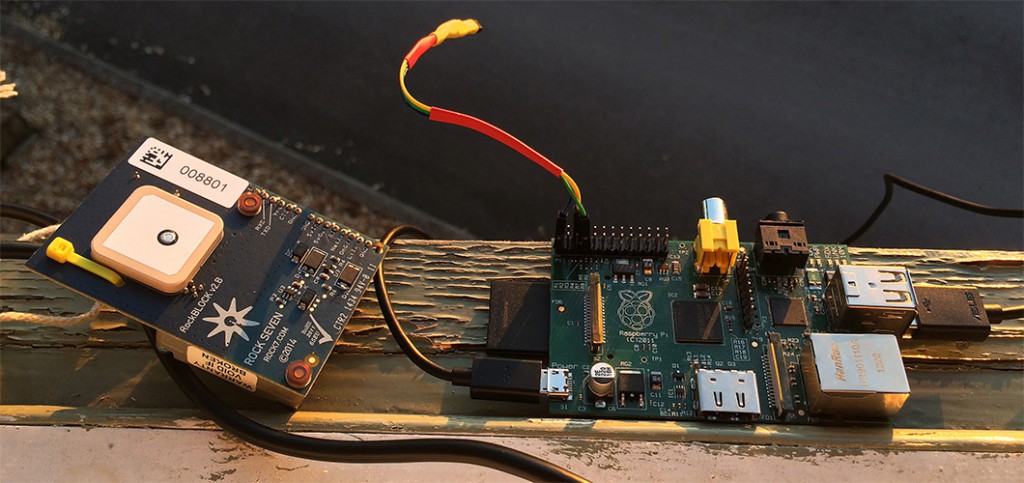
Today we’ll be creating a remote controlled satellite weather station using a Raspberry Pi, a temperature sensor and a RockBLOCK. The envisioned application would be a weather station in a really remote location (i.e. outside of mobile/cellular coverage) – maybe in the middle of the desert, the jungle, or even the arctic – sending its data back to some kind of central weather system.
We’ll keep it really simple, using just one temperature sensor, but additional sensors could be added very easily to expand the scope – to measure humidity, atmospheric pressure or light levels. The temperature sensor used is a Maxim DS18B20 digital thermometer which provides a reasonably accurate reading (+/- 0.5 degrees) over a wide temperature range (-55 to +125C)
The weather station application will periodically transmit its sensor readings using the RockBLOCK. For those of you who don’t know the RockBLOCK, it’s an awesome little module that enables small amounts of data to be sent/received via satellite from anywhere in the world. Ideal for creating all manor of remotely deployed projects, like the weather station! We’ll be utilising the excellent pyRockBlock library (excellent, because it’s written by me!) to take care communicating with the satellites via the RockBLOCK.
The temperature sensor selected operates on the 1-Wire bus, which means it can be connected directly into the GPIO pins on the RPi, and with a little bit of configuration, can very easily be interrogated by Python – without the need for any additional electronics!
Part 1 – Wiring
The temperature sensor has three connections: positive, ground and signal – these should be connected to pins 1 (Blue), 4 (Yellow) and 7 (Green) respectively on the Raspberry Pi.
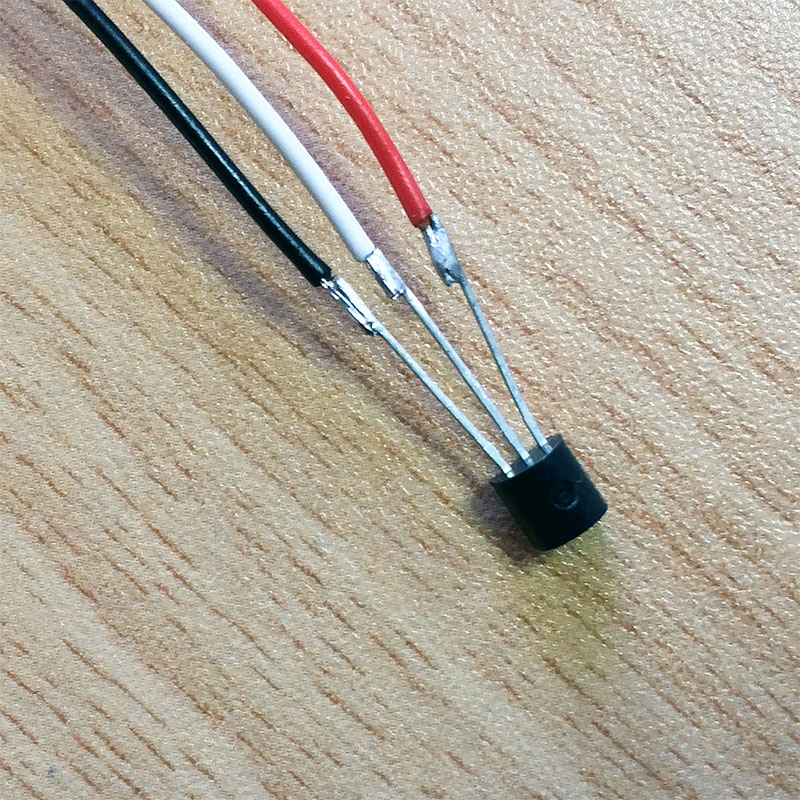
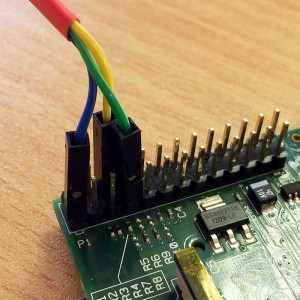 This module would normally require a pull-up resistor, but this can actually be configured with software with the Raspberry Pi, so no need to get your soldering iron out just yet! Be careful that you connect the sensor correctly, if for example you get the ground and positive mixed up, the sensor will get very hot very quickly!
There have already been many great tutorials on using the DS1B20 sensor with the RPi – but I initially struggled to see the sensor on the RPi. I thought, it’s got three wires, how hard could it be! I discovered, that there had been some changes made to Raspbian that required an additional configuration step to get it working correctly.
So on the RPi, using your favourite editor, edit /boot/config.txt to include the following line, just add it to the bottom of the file (make sure you edit the file as root/sudo).
|
1 |
dtoverlay=w1-gpio |
Secondly, you’ll need to add the modprobe drivers for the 1-Wire system to the bottom of your /etc/modules file (again, running as root/sudo).
|
1 2 |
w1-gpio w1-therm |
Restart your RPi – you should now see two additional items in your startup log:
[info] Loading kernel module w1-gpio
[info] Loading kernel module w1-therm
If you’ve wired everything correctly, and the drivers have been loaded correctly, you should now be able to interrogate the sensor. The system will create a handle for the sensor in /sys/bus/w1/devices/ – there should be a sub-directory called 28-XXXXXXXXXXXX (e.g. 28-0000049b5484) – this is the unique handle to your sensor. It’s important to remember that each sensor is programmed during manufacture with a unique handle. Therefore you should never hardcode this value, it will change if you use a different sensor – you’ve been warned!
To read the current temperature sensor run the following:
cat /sys/bus/w1/devices/28-0000049b5484/w1_slave
You should see an output that looks something like this:
2a 01 4b 46 7f ff 06 10 16 : crc=16 YES
2a 01 4b 46 7f ff 06 10 16 t=18625
We’re only interested in the second line, and specifically the string t=18625 (this is the temperature) – to get decimal degrees value, simply divide this by 1000 = 18.625°C.
Part 2 – Software
If you’ve not done so already, follow the Satellite communications with RockBLOCK project to getting your RockBLOCK up and running.
Grab the latest copy of the Weather Station project from GitHub.
git clone https://XXX
I’ve created a simple class (temperatureBot) to query the sensor, get the raw reading and convert the value correctly into decimal degrees. This snippet prints the temperature every 10 seconds.
|
1 2 3 4 5 6 7 |
while(True): tb = temperatureBot.temperatureBot("/sys/bus/w1/devices/28-d9034234324") print tb.obtain() time.sleep(10) |
But you said not to hardcode the sensor handle! Very observant of you – luckily the temperatureBot class provides some simple discovery logic to find your sensor automatically. If you provide None in the temperatureBot constructor, it will search your /sys/bus/w1/devices/ directory for the first sub-directory that starts 28-XXX. Obviously, this won’t work if you’ve got more than one sensor attached, nor if you’re using a different manufacturer, but should work well for most applications.
|
1 2 3 4 5 6 7 |
while(True): tb = temperatureBot.temperatureBot(None) print tb.obtain() time.sleep(10) |
Now we’ve got our temperature reading, lets get it transmitted to the satellites.
Using pyRockBlock this can be achieved using the following method, which will transmit the current time and temperature. You’ll notice that i’ve added a prefix of “T” this is not essential, but it provides the scope for future enhancements, for example “T” could be replaced for “H” when sending the humidity etc.
|
1 2 3 4 5 6 7 |
def emit(self, value): rb = rockBlock.rockBlock("/dev/ttyUSB0", self) rb.sendMessage("T" + str( time.time() ) + ":" + str(value) ) rb.close() |
I would recommend reading the pyRockBlock project guide, this will explain the satellite transmission steps in more detail, including the various callbacks to denote success or failure. Let’s combine the two methods and flesh out the project, i’ve introduced the SLEEP_INTERVAL variable, so that we can change this at runtime, as you’ll see in the next section…
|
1 2 3 4 5 6 7 8 9 10 11 12 13 14 15 16 17 18 19 20 21 22 23 24 25 26 27 28 29 |
import rockBlock import time import temperatureBot from rockBlock import rockBlockProtocol class Example (rockBlockProtocol): SLEEP_INTERVAL = 60 def main(self): tb = temperatureBot.temperatureBot(None) while(True): value = tb.obtain() self.emit(value) time.sleep( self.SLEEP_INTERVAL) def emit(self, value): rb = rockBlock.rockBlock("/dev/ttyUSB0", self) rb.sendMessage("T:" + str( time.time() ) + ":" + str(value) ) rb.close() |
As well as transmitting messages from the field, the RockBLOCK can also receive messages; this is especially useful for remotely deployed applications. For this project, we are going to setup the capability to remotely change the frequency for which temperatures are obtained and emitted.
I’ll explain how to actually send messages to the RockBLOCK in a minute, but firstly, I’d like to explain how the messages will come through pyRockBlock and into our application.
Given the nature of satellite communications, messages sent to the RockBLOCK are not “pushed” like an SMS, instead they need to be “pulled”, that is you must request the message from the satellite. So in order to check for messages, we must first establish a session with the satellite, this can be done in two ways, either by using the checkMessage command or by sending a message, using the sendMessage command.
As we are regularly transmitting messages (using the sendMessage command) there is no need to make additional calls to checkMessage; therefore, if we have a new message, it will be received when we transmit our temperature readings. The pyRockBLOCK library takes care of all the hard work, and simply makes a callback (to rockBlockReceived) when a message is received.
Below is the rockBlockReceived implementation for this project, i’ve devised a simple message format, enabling additional commands in the future. To change the frequency of the transmission to every 120 seconds, you would simply send a message of “F120”
|
1 2 3 4 5 6 7 8 9 10 11 12 13 14 15 16 |
def rockBlockRxReceived(self,mtmsn,data): if( str(data).startswith("F") ): newInterval = int( data[1:] ) #Frequency should be between 30 and 3000 seconds if(newInterval >= 30 and newInterval <= 3000): self.SLEEP_INTERVAL = newInterval print "New Interval " + str(newInterval) else: print "Unknown Command Received" |
So the complete Weather Station application would look like this:
|
1 2 3 4 5 6 7 8 9 10 11 12 13 14 15 16 17 18 19 20 21 22 23 24 25 26 27 28 29 30 31 32 33 34 35 36 37 38 39 40 41 42 43 44 45 46 47 48 49 50 |
import rockBlock import time import temperatureBot from rockBlock import rockBlockProtocol class Example (rockBlockProtocol): SLEEP_INTERVAL = 60 def main(self): tb = temperatureBot.temperatureBot(None) while(True): value = tb.obtain() self.emit(value) time.sleep( self.SLEEP_INTERVAL) def emit(self, value): rb = rockBlock.rockBlock("/dev/ttyUSB0", self) rb.sendMessage("T:" + str(time.time()) + ":" + str(value) ) rb.close() def rockBlockRxReceived(self,mtmsn,data): print "rockBlockRxReceived " + str(mtmsn) + "/" + data + "/" + str( len(data) ) #F = Update Frequency e.g. F100 = Update transmission if( str(data).startswith("F") ): #Parse interval newInterval = int( data[1:] ) #Frequency should be between 30 and 3000 seconds if(newInterval >= 30 and newInterval <= 3000): self.SLEEP_INTERVAL = newInterval print "New Interval " + str(newInterval) else: print "Unknown Command Received" |
Sending/Receiving data from your Weather Station
Messages are sent/received to/from your RockBLOCK using the Rock 7 Core, or the accompanying web-service
For more detailed information on using the accompanying web-service, please check out the Rock 7 Core – Endpoints guide.
Comments are closed.